book-notes
Kubernetes
Kubernetes for Developers: Core Concepts
Course by Dan Wahlin (Pluralsight)
- Kubernetes for Developers: Core Concepts
Kubernetes overview
Why Kubernetes?
- Because managing containers by hand is difficult
- What happens when some containers go down?
- How do you manage different kinds of containers and make sure they are all connected? (server, API, storage, etc)
- How do you update containers while ensuring uptime?
Wouldn’t it be nice if can:
- Not worry about the management of containers
- Eliminate single points of failure
- Scale containers easily
- Update containers without bringing down the application (zero downtime deployment)
- Have robust networking and persistent storage options
Kubernetes is a conductor of a container orchestra
Key Kubernetes features
- Service discovery / load balancing
- Storage orchestration
- Automate rollouts / rollbacks
- Self-healing
- Secret and configuration management
- Horizontal scaling
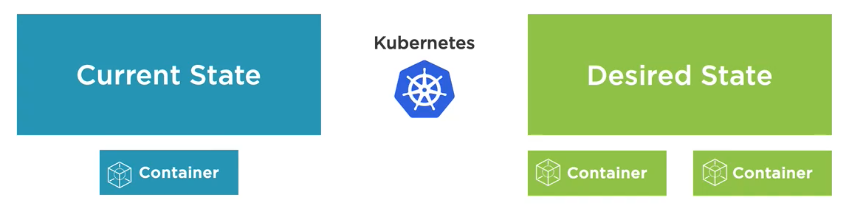
The big picture
Kubernetes is a container and cluster management that provides a declarative way to define a cluster’s state (if you define a desired state, kubernetes will get you there).
Master and worker nodes
master nodeis the boss of the operation that knows how to manage the different employees, which we callworker nodesmaster nodeandworker nodesform aclustermaster nodewill startpodsinside theworker nodes
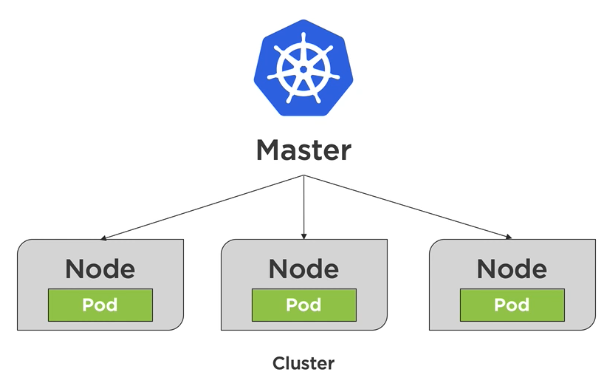
Pods and Containers
podscould be seen as packaging for thecontainersnodescan run one or morepods

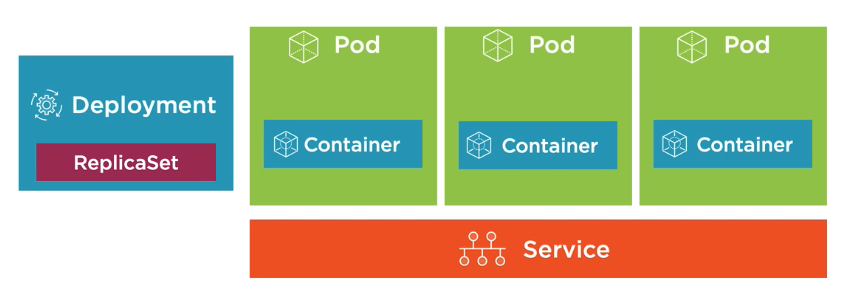
Kubernetes building blocks
- while you can have many pods running on different nodes on your cluster, you’re going to need a way to deploy the pods (
deployment/ReplicaSet) - you also need a way to enable the pods to communicate with each other or to external APIs (
service)
Master node and kubectl
etcd (store): a database for themaster nodeto track things that happen in theclustercontroller manager: responsible for when a request comes in, the manager can act upon that request and schedule it using aschedulerscheduler: determines when the nodes and the different pods come to life or go away, etc.kubectl: command line tool that we can use to send different requests into themaster node, and those requests can then be scheduled to run on our differentworker nodeswithin thecluster
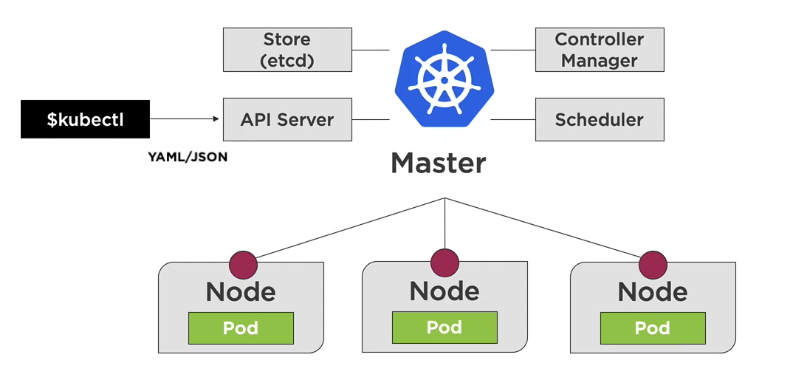
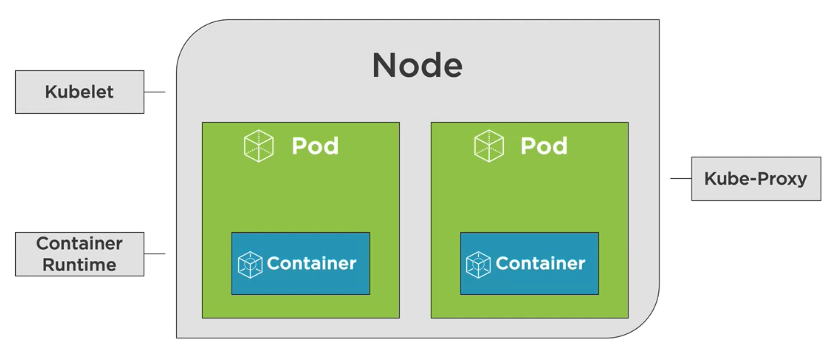
Worker node
kubelet: an agent that registers theworker nodewith theclusterand reports back and forth to the manager (lives inside theworker node)container runtime: runtime to run containers within the podskube-proxy: ensures each pod gets a unique IP address and ties into theservices
Benefits and use cases
Key container benefits
- Accelerate developer onboarding
- Can get an entire environment up and running
- Eliminate app conflicts
- Environment consistency
- Ship software faster
Key kubernetes benefits
- orchestrate containers
- zero-downtime deployments
- self healing capability
- scale containers
Developer use cases for kubernetes
- Emulate production locally
- Move from
docker-composeto kubernetes - Create an end-to-end testing environment
- Ensure application scales properly
- Ensure secrets/configs are working properly
- Performance testing scenarios
- Workload scenarios (CI/CD and more)
- Learn how to leverage deployment options
- Help devops create resources and solve problems
Installing and running kubernetes locally
- minikube
- docker desktop
# common kubectl commands
k version
k cluster-info
k get all
k get pods
k get services
Creating Pods
Pod core concepts
Pods
- Smallest object of the kubernetes object model
- Environment for containers
- A way to organize application “parts” into pods (server, caching, APIs, database, etc)
- A pod has an IP address, memory, volumes, etc shared across containers
- We can scale pods horizontally as replicas, which can be load-balanced by kubernetes
- Pods live and die but never come back to life
- Master node schedules pods on a worker node
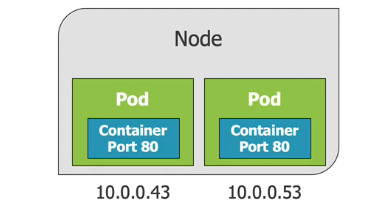
Pods, IPs, and Ports
- Pods within a node have a unique IP address (by default it will be a cluster IP address)
- Pod containers:
- Share the same network namespace (share IP)
- Have same localhost
- Ports need to be unique if you have multiple containers in a single pod
- Ports can be reused by containers in separate pods
- Pods never span nodes (it cannot exist in two different nodes)
Creating pods
# run the nginx:alpine container in a pod
k run [pod-name] --image=nginx:alpine

# list pods
k get pods

# list all resources
k get all
Expose a pod port
- Pods and containers are only accessible within the kubernetes cluster by default
- One way to expose a container port externally is to use port forwarding
# enable pod container to be called externally (host port : internal port)
k port-forward [pod-name] 8080:80

# delete pod
k delete pod [pod-name]

# A deployment is responsible for the current state to be maintained. That is why if you use the delete command, it will spawn up a new pod right away.

# delete deployment
k delete deployment [deployment-name]
YAML fundamentals
YAML files are composed of maps and lists
- Indentation matters (be consistent!)
- Always use spaces instead of tabs
- Data types:
- Maps
- Key value pairs
- Lists
- Sequence of items
Defining a pod with YAML
file.pod.yml
apiVersion: v1
kind: Pod # type of kubernetes resource
metadata: # metadata about the pod
  name: my-nginx
  labels: # used to link with other resources (services, deployments)
    app: nginx
    rel: stable
spec: # blueprint for the pod
  containers: # info about the container that will run in the pod
  - name: my-nginx
    image: nginx:alpine
    ports:
    - containerPort: 80
    resources: # add resource constraints to the containers
      limits:
        memory: "128Mi" # 128 MB
        cpu: "200m" # 200 millicpu (0.2 cpu)
# to create a pod using YAML, use the kubectl create command along with --filename
k create -f file.pod.yml

# perform a dry run
k create -f file.pod.yml --dry-run --validate=true

# to create or apply changes to a pod using YAML, use the kubectl apply command along with --filename
# use this over `create`
k apply -f file.pod.yml

# use --save-config when you want to use `apply` in the future. It stores current properties in resource’s annotations.
k create -f file.pod.yml --save-config

# delete pod using YAML file that created it
k delete -f file.pod.yml

# get output of a pod (you can see that there are annotations if you created your pod with --save-config)
k get pod my-nginx -o yaml

# describe pod (the events at the very end is useful for debugging)
k describe pod my-nginx

# interactive mode
k exec my-nginx -it sh

# edit pod
k edit -f nginx.pod.yml

# delete pod (this will actually delete the pod since we do not have a deployment)
k delete -f nginx.pod.yml
Pod health
Kubernetes relies on probes to determine the health of a pod container. A probe is a diagnostic performed periodically by the kubelet on a container.
Types of probes
- Liveness probe
- Determines if a pod is healthy and running as expected
- When should a container restart?
- Readiness probe
- Determines if a pod should receive requests
- When should a container start receiving traffic?
- Failed pod containers are recreated by default (restartPolicy defaults to always)
Probe Actions
- ExecAction - executes an action inside the container
- TCPSocketAction - TCP check against the container’s IP address on a specified port
- HTTPGetAction - HTTP GET request against container
Probes can have the following results
- Success
- Failure
- Unknown
Liveness probe
spec:
  containers:
  - name: my-nginx
    image: nginx:alpine
    livenessProbe: # define liveness probe
      httpGet: # check liveness by sending HTTP requests
        path: /index.html # check /index.html on port 80
        port: 80
      initialDelaySeconds: 15 # wait 15 seconds before sending the first request
      timeoutSeconds: 2 # timeout after 2 seconds
      periodSeconds: 5 # check every 5 seconds
      failureThreshold: 1 # allow 1 failure before failing the pod
Readiness probe
spec:
  containers:
  - name: my-nginx
    image: nginx:alpine
    readinessProbe: # define readiness probe
      httpGet:
        path: /index.html # check /index.html on port 80
        port: 80
      initialDelaySeconds: 2 # wait 2 seconds
      periodSeconds: 5 # check every 5 seconds
Creating Deployments
Deployments Core Concepts
A ReplicaSet is a declarative way to manage pods. A Deployment is a declarative way to manage pods using a ReplicaSet.
Pods, Deployments, and ReplicaSets
- Deployments and ReplicaSets ensure Pods stay running and can be used to scale Pods
The Role of ReplicaSets
- ReplicaSets act as a Pod controller:
- ensures the requested number of pods are available through a self-healing mechanism (it creates a new pod if an existing pod goes down)
- can be used to scale pods horizontally
- relies on a pod template
- no need to create pods directly!
The Role of Deployments
- A Deployment manages ReplicaSets which in turn manage pods:
- scales ReplicaSets, which scale pods
- supports zero-downtime updates by creating and destroying ReplicaSets
- provides rollback functionality
- creates a unique label that is assigned to the ReplicaSet and generated pods
- YAML is very similar to a ReplicaSet
Creating a Deployment
Deployment is a higher level wrapper around ReplicaSet.
apiVersion: apps/v1
kind: Deployment # resource type
metadata: # metadata about the deployment
  name: frontend
  labels: # labels can be used with selectors to tie resources together
    app: my-nginx
    tier: frontend
spec: # define the deployment spec
  selector: # selector will be used to select the template to create the pods
    matchLabels:
      tier: frontend # here we are selecting the template with the label frontend (this will select the pod template below)
  template: # pod template
    metadata:
      labels:
        tier: frontend
    spec: # define the pod spec
      containers: # container that will run in the pod
      - name: my-nginx
        image: nginx:alpine
kubectl and Deployments
# Start Deployments
k apply -f nginx.deployment.yml

# Describe Deployments
k describe deployment my-nginx

# List all Deployments and their labels
k get deployments --show-labels

# Get all Deployments with a specific label
k get deployments -l app=nginx

# Delete Deployment
k delete deployment [deployment-name]

# Scale the Deployment pods
k scale deployment [deployment-name] --replicas=5
Deployment options
Zero downtime deployments allow software updates to be deployed to production without impacting end users
- Rolling updates (default)
- Blue-green deployments
- once new deployments are proven good, traffic is routed over to the new deployments
- Canary deployments
- small amount of traffic goes to the new deployments
- Rollbacks
Creating Services
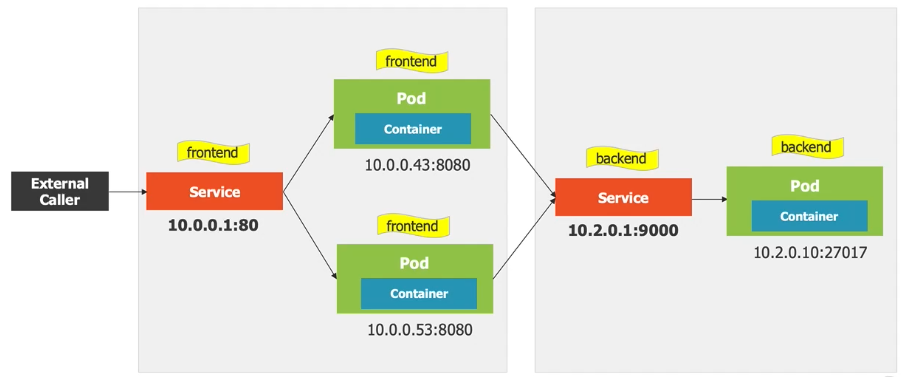
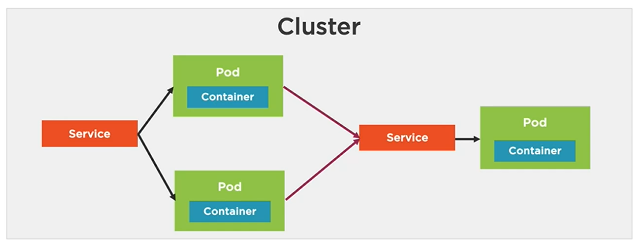
Services Core Concepts
A service provides a single point of entry for accessing one or more pods We cannot rely on IP addresses of pods because they live and die. That’s why we need services to manage them at a higher level.
Pods are “mortal” and may only live a short time (ephemeral). You can’t rely on a pod IP address staying the same. Pods can also horizontally scale. A pod gets an IP address after it has been scheduled (no way for clients to know the IP address ahead of time).
The Role of Services
- services abstract pod IP addresses from consumers
- load balances between pods
- labels associate a service with a pod
- node’s kube-proxy creates a virtual IP for services
- Layer 4 (TCP/UDP over IP)
- Services are not ephemeral
- Creates endpoints which sit between a service and a pod
Service Types
ClusterIP Service
- Internal to cluster (default)
- Only pods within the cluster can talk to the service
- Purpose of ClusterIP is to give each pod an IP address
- Services and pods are joined together by labels and selectors
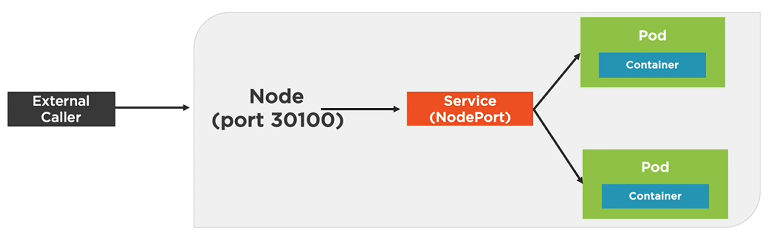
NodePort Service
- Exposes the service on each Node’s IP at a static port
- allocates a port from a range (default is 30000-32767)
- each Node proxies the allocated port
LoadBalancer Service
- Exposes a service externally
- Useful when combined with a cloud provider’s load balancer
- NodePort and ClusterIP services are created
- Each node proxies the allocated port
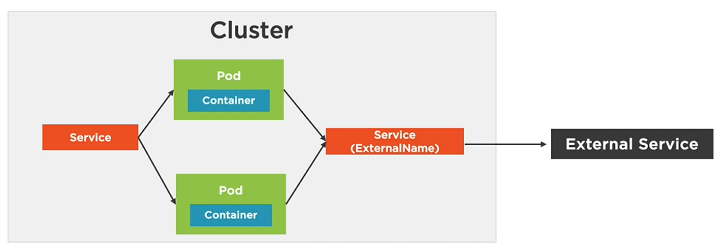
ExternalName Service
- Service that acts as an alias for an external service
- External service details are hidden from cluster
Creating a Service with kubectl
# Listen on port 8080 locally and forward to service's pod
k port-forward service/[service-name] 8080
Creating a Service with YAML
apiVersion: v1
kind: Service
metadata:
  name: frontend # name of service (each service gets a DNS entry, which can be used in place of the actual IP address)
ClusterIP Service
apiVersion: v1
kind: Service
metdata:
  name: nginx-clusterip # DNS name
spec:
  type: ClusterIP
  selector:
    app: my-nginx
  ports:
  - port: 8080
    targetPort: 80
NodePort Service
apiVersion: v1
kind: Service
spec:
  type: NodePort
  selector:
    app: nginx
  ports:
  - port: 80
    targetPort: 80
    nodePort: 31000
LoadBalancer Service
apiVersion: v1
kind: Service
spec:
  type: LoadBalancer
  selector:
    app: nginx
  ports:
  - port: 80
    targetPort: 80
ExternalName Service
apiVersion: v1
kind: Service
metadata:
  name: external-service # other pods can use this alias to access the external service
spec:
  type: ExternalName
  externalName: api.acmecorp.com
  ports:
  - port: 9000
kubectl and Services
# Update a Service
k apply -f file.service.yml

# Delete a Service
k delete -f file.service.yml
k delete service [service-name]

# Get services
k get services

# Testing a Service and Pod with curl
# Grab the IP address of a pod (podIP)
k get pod [pod-name] -o yaml

# Shell into a Pod and test a URL
k exec [pod-name] -- curl -s http://podIP

# Install and use curl
k exec [pod-name] -it sh
> apk add curl
> curl -s http://podIP
Understanding Storage Options
Storage Core Concepts
Q: How do you store application state/data and exchange it between pods with kubernetes? A: Volumes (although other data storage options exist such as database)
A volume can be used to hold data and state for pods and containers
- pods live and die so their file system is short lived
- volumes can be used to store state/data and use it in a pod
- a pod can have multiple volumes attached to it
- containers rely on a mountPath to access a volume
A volume references a storage location
- it must have a unique name
- it is attached to a pod and may or may not be tied to the pod’s lifetime
- a volume mount references a volume by name and defines a mountPath
Volume Types
- emptyDir
- for storing “transient” data useful for sharing files between containers running in a pod (tied to the lifetime of the pod)
- hostPath
- pod mounts into the node’s filesystem
- could cause a problem if a pod is rescheduled in a different node
- nfs
- an NFS (Network File System) share mounted into the pod
- configMap/secret
- sepcial types of volumes that provide a pod with access to kubernetes resources
- persistentVolumeClaim
- provides pods with a more persistent storage option that is abstracted from the details
- cloud
- cluster-wide storage
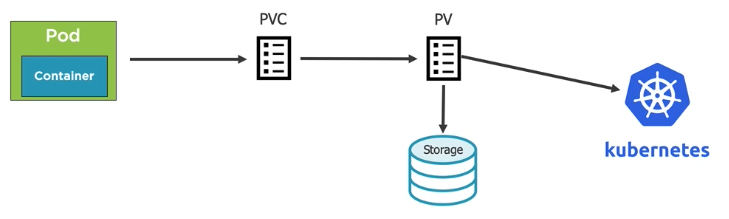
PersistentVolume
- a cluster-wide storage resource that relies on network-attached storage (NAS)
- available to a pod even if the pod gets rescheduled to a different node
- relies on a storage provider such as NFS, cloud storage or other options
- associated wit ha pod by using a PersistentVolumeClaim (PVC), which is a request for a storage unit (PV)
- Create a PersistentVolume
- Create a PersistentVolumeClaim
PersistentVolume & PersistentVolumeClaim examples
StorageClasses
- used to define different “classes” of storage, acting as a type of storage template
- supports dynamic provisioning of PersistentVolumes
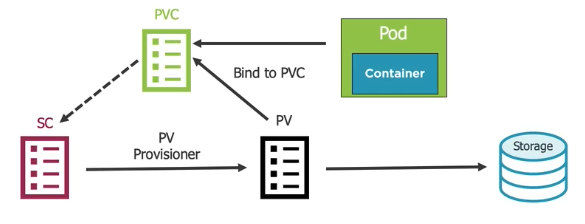
- A pod’s volume references PersistentVolumeClaim
- PersistentVolumeClaim references StorageClass
- Kubernetes uses StorageClass provisioner to dynamically provision a PersistentVolume
- PersistentVolume provisions/binds to the Storage
- PersistentVolume binds to PersistentVolumeClaim
Any properties from StorageClass template will be available to PersistentVolume and PersistentVolumeClaim
Creating ConfigMaps and Secrets
ConfigMap Core Concepts
ConfigMap
- provides a way to inject configuration data into a container
- can store entire files or provide key/value pairs:
- store in a file
- provide from command line
- ConfigMap manifest
Accessing ConfigMap Data in a Pod
- ConfigMaps can be accessed from a pod using:
- environment variables (key/value)
- ConfigMap Volume (access as files)
Creating a ConfigMap
Defining values in a ConfigMap manifest
apiVersion: v1
kind: ConfigMap
metadata:
  name: app-settings
  labels:
    app: app-settings
data:
  enemies: aliens
  lives: "3"
  enemies.cheat: "true"
  enemies.cheat.level=noGoodRotten
Ways to create a ConfigMap
# Create a ConfigMap using data from a file
k create configmap [configmap-name] --from-file=[path-to-file]

# Create ConfigMap using data from an env file
k create configmap [configmpa-name] --from-env-file=[path-to-file]

# Create ConfigMap from individual data values
k create configmap [cm-name] --from-literal=exampleKey=exampleValue

# Create from a ConfigMap manifest
k create -f file.configmap.yml
Using a ConfigMap
# get all configmaps
k get configmap

# get configmap info
k get configmap [configmap-name] -o yaml
k get cm [configmap-name] -o yaml
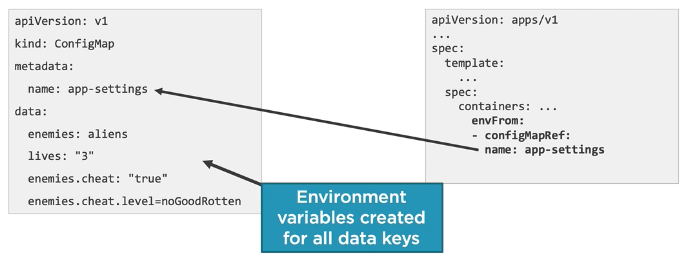
Environment Variables
- envFrom can be used to load all ConfigMap keys/values into environment variables
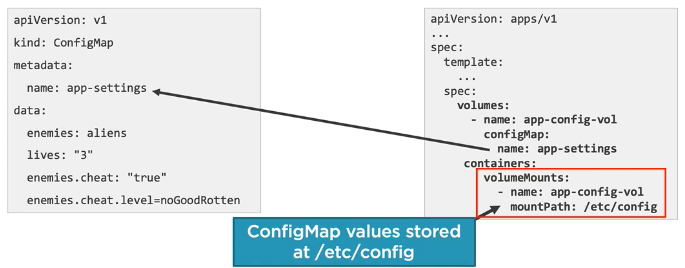
Volume
- ConfigMap values can be loaded through a volume
- Each key is converted to a file - value is added into the file
Secrets Core Concepts
Secret
- an object that contains a small amount of sensitive data such as passwords, tokens, keys, etc
- k8s can store sensitive information
- avoids storing secrets in container images, files or deployment manifests
- mount secrets into pods as files or as environment variables
- k8s only makes secrets available to nodes that have a pod requesting the secret
- secrets are stored in tmpfs on a node (not on disk)
Secrets Best Practices
- enable encryption at rest for cluster data
- limit access to etcd (where secrets are stored) to only admin users
- use SSL/TLS for etcd peer-to-peer communication
- manifest (YAML/JSON) files only base64 encode the secrets
- pods can access secrets so secure which users can create pods. Role-based access control (RBAC) can be used.
Creating a secret
# Create a secret and store securely in k8s
k create secret generic [secret-name] --from-literal=pwd=my-password

# Create a secret from a file
k create secret generic [secret-name] \
--from-file=ssh-privatekey=~/.ssh/id_rsa \
--from-file=ssh-publickey=~/.ssh/id_rsa.pub

# Create a secret from a key pair
k create secret tls [secret-name] --cert=path/to/tls.cert \
--key=path/to/tls.key

# Get secrets
k get secrets

# Get YAML for specific secret
k get secrets [secret-name] -o yaml
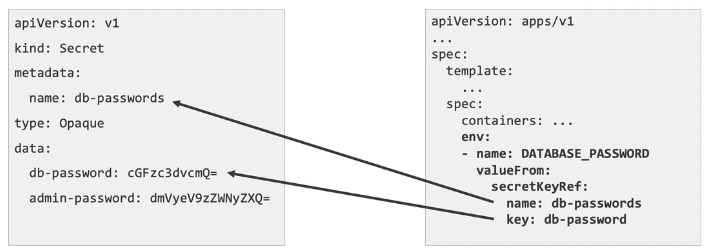
Accessing a secret: environment variables
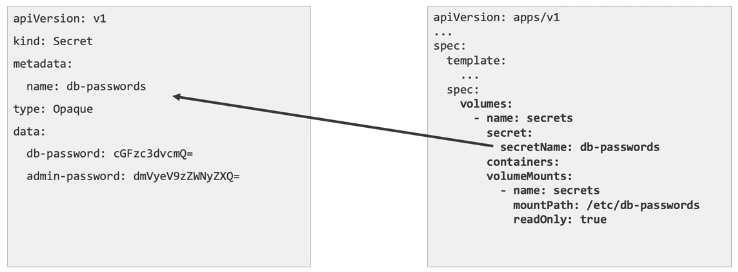
Accessing a secret: volumes
Putting it all together
Troubleshooting Techniques
# View the logs for a pod's container
k logs [pod-name]

# View the logs for a specific container within a pod
k logs [pod-name] -c [container-name]

# View the logs for a previously running pod
k logs -p [pod-name]

# Stream a pod's logs
k logs -f [pod-name]
# Describe a pod
k describe pod [pod-name]

# Change a pod's output format
k get pod [pod-name] -o yaml

# Change a deployment's output format
k get deployment [deployment-name] -o yaml

# Shell into a pod container
k exec [pod-name] -it sh